
Studio Terabyte is a full stack web development studio who finds and builds solutions that fit your project
What is Tauri
Tauri describes itself as a framework for building tiny, blazingly fast binaries for all major desktop platforms. Developers can integrate any front-end framework that compiles to HTML, JS and CSS for building their user interface. The backend of the application is a rust-sourced binary with an API that the front-end can interact with.
So, Tauri is a framework which allows you to build cross-platform apps using technologies you are already familiar with. And now it also supports mobile apps. Sounds great, doesn't it
Why use Tauri?
Now, why would you use something like Tauri instead of Kotlin for Android apps and Swift for iOS apps? First and foremost it allows you to work with technologies you are already familiar with. Not being forced to learn a whole new programming language, not to mention the entire toolchain the language requires, is an enormous time safer. It also makes it easy to expand your current web app into the mobile app space without having to hire dedicated engineers.
Besides those reason, others to consider are:
- Security
- FLOSS
- Bundle Size
- Performance
- Plugin System
- Self Updater
Minimal Tauri mobile app
*Note: This is based on the 2.0 Alpha version and the early version of the documentation. An updated version of the create-tauri-app utility is in development to make a number of the following steps easier. That being said, understanding the basics is always helpful!
The basics
First, ensure that you have all the prerequisites installed needed for the mobile app development. I'm working on a mac and building an iOS app, so I'm following the instructions here. If you use a different OS or want to target Android, you can start here instead.
Now that we have the basics ready, let's start by installing the Tauri create-tauri-app Rust utility. This will allow us to easily initialize a new Tauri project. I am going for a Vue and TypeScript project.
cargo install create-tauri-app

cargo create-tauri-app
Now cd into the new folder that was created and make sure that we are on the newest version. First, run the following command
npm install @tauri-apps/cli@next @tauri-apps/api@next
Great, that was the Node part! Now cd into the src-tauri folder and run the following commands to update the Rust part:
cargo add tauri@2.0.0-alpha.0

cargo add tauri-build@2.0.0-alpha.0 --build

cargo install tauri-cli --version "^2.0.0-alpha"
We are getting ready to develop our mobile app! To develop mobile Tauri applications, the frontend must serve the assets listening on your public network address. The network address can be found using the internal-ip NPM package. You can install it with the following command:
npm install --save-dev internal-ip
Configuration updates
Next, we need to update the vite.config.ts file. I'm using Vue so mine looks like this:
import { defineConfig } from 'vite'
import { internalIpV4 } from 'internal-ip'
import vue from "@vitejs/plugin-vue";

export default defineConfig(async () => {
  const host = await internalIpV4()

  /** @type {import('vite').UserConfig} */
  const config = {
    plugins: [vue()],
  // Vite options tailored for Tauri development and only applied in `tauri dev` or `tauri build`
  // prevent vite from obscuring rust errors
  clearScreen: false,
    server: {
      host: '0.0.0.0', // listen on all addresses
      port: 5173,
      strictPort: true,
      hmr: {
        protocol: 'ws',
        host,
        port: 5183,
      },
    },
  // to make use of `TAURI_DEBUG` and other env variables
  // https://tauri.studio/v1/api/config#buildconfig.beforedevcommand
  envPrefix: ["VITE_", "TAURI_"],
  build: {
    // Tauri supports es2021
    target: process.env.TAURI_PLATFORM == "windows" ? "chrome105" : "safari13",
    // don't minify for debug builds
    minify: !process.env.TAURI_DEBUG ? "esbuild" : false,
    // produce sourcemaps for debug builds
    sourcemap: !!process.env.TAURI_DEBUG,
  },
  }

  return config
})
If you use a different framework, make sure to keep the framework-specific plugins that were already in this file.
One more configuration update. This is an important one!
Update tauri.conf.json:
There are two things that we need to change here. First, add the following object within the bundle object like so:
    "bundle": {
      "active": true,
      "category": "DeveloperTool",
      "copyright": "",
      "deb": {
        "depends": []
      },
      "externalBin": [],
      "iOS": {
        "developmentTeam": "demo"
      },
      "icon": [
Also change the port that Tauri is listening to so that it matches the one your JS framework will be running. In my case it's 5173. So like this:
  "build": {
    "beforeDevCommand": "npm run dev",
    "beforeBuildCommand": "npm run build",
    "devPath": "http://localhost:5173", <- Here
    "distDir": "../dist",
    "withGlobalTauri": false
  },
Rust changes
Now that the config files are ready, let's make some changes to our Rust files.
- Update your
src-tauri/Cargo.tomlfile with the following line:
[lib]
crate-type = ["staticlib", "cdylib", "rlib"]
- Create a new
src-tauri/src/lib.rsfile and add the following content:
use tauri::App;

#[cfg(mobile)]
mod mobile;
#[cfg(mobile)]
pub use mobile::*;

pub type SetupHook = Box<dyn FnOnce(&mut App) -> Result<(), Box<dyn std::error::Error>> + Send>;

#[tauri::command]
fn greet(name: &str) -> String {
    format!("Hello, {}!", name)
}

#[derive(Default)]
pub struct AppBuilder {
    setup: Option<SetupHook>,
}

impl AppBuilder {
    pub fn new() -> Self {
        Self::default()
    }

    #[must_use]
    pub fn setup<F>(mut self, setup: F) -> Self
    where
        F: FnOnce(&mut App) -> Result<(), Box<dyn std::error::Error>> + Send + 'static,
    {
        self.setup.replace(Box::new(setup));
        self
    }

    pub fn run(self) {
        let setup = self.setup;
        tauri::Builder::default()
            .setup(move |app| {
                if let Some(setup) = setup {
                    (setup)(app)?;
                }
                Ok(())
            })
            .invoke_handler(tauri::generate_handler![greet])
            .run(tauri::generate_context!())
            .expect("error while running tauri application");
    }
}

#[cfg(mobile)]
fn do_something() {
    println!("Hello from Mobile!");
}

#[cfg(desktop)]
fn do_something() {
    println!("Hello from Desktop!");
}

fn run() {
    if cfg!(mobile) {
        println!("Hello from Mobile!");
    } else {
        println!("Hello from Desktop!");
    }
}
- Create a new
src-tauri/src/mobile.rsfile and add the following content:
#[tauri::mobile_entry_point]
fn main() {
  super::AppBuilder::new().run();
}
This is an important step
- Update the content of
src-tauri/src/main.rsto:
#![cfg_attr(
  all(not(debug_assertions), target_os = "windows"),
  windows_subsystem = "windows"
)]

pub fn main() {
  // Change demo_mobile_app to the name of your app!
  demo_mobile_app::AppBuilder::new().run();
}
Now that this has been taken care off, finish off with the following steps:
- run
cargo tauri ios initin the main folder.- if you get an error regarding cocoapods, run:
brew install cocoapodsand try again
- if you get an error regarding cocoapods, run:
- run
cargo tauri ios devto start the server
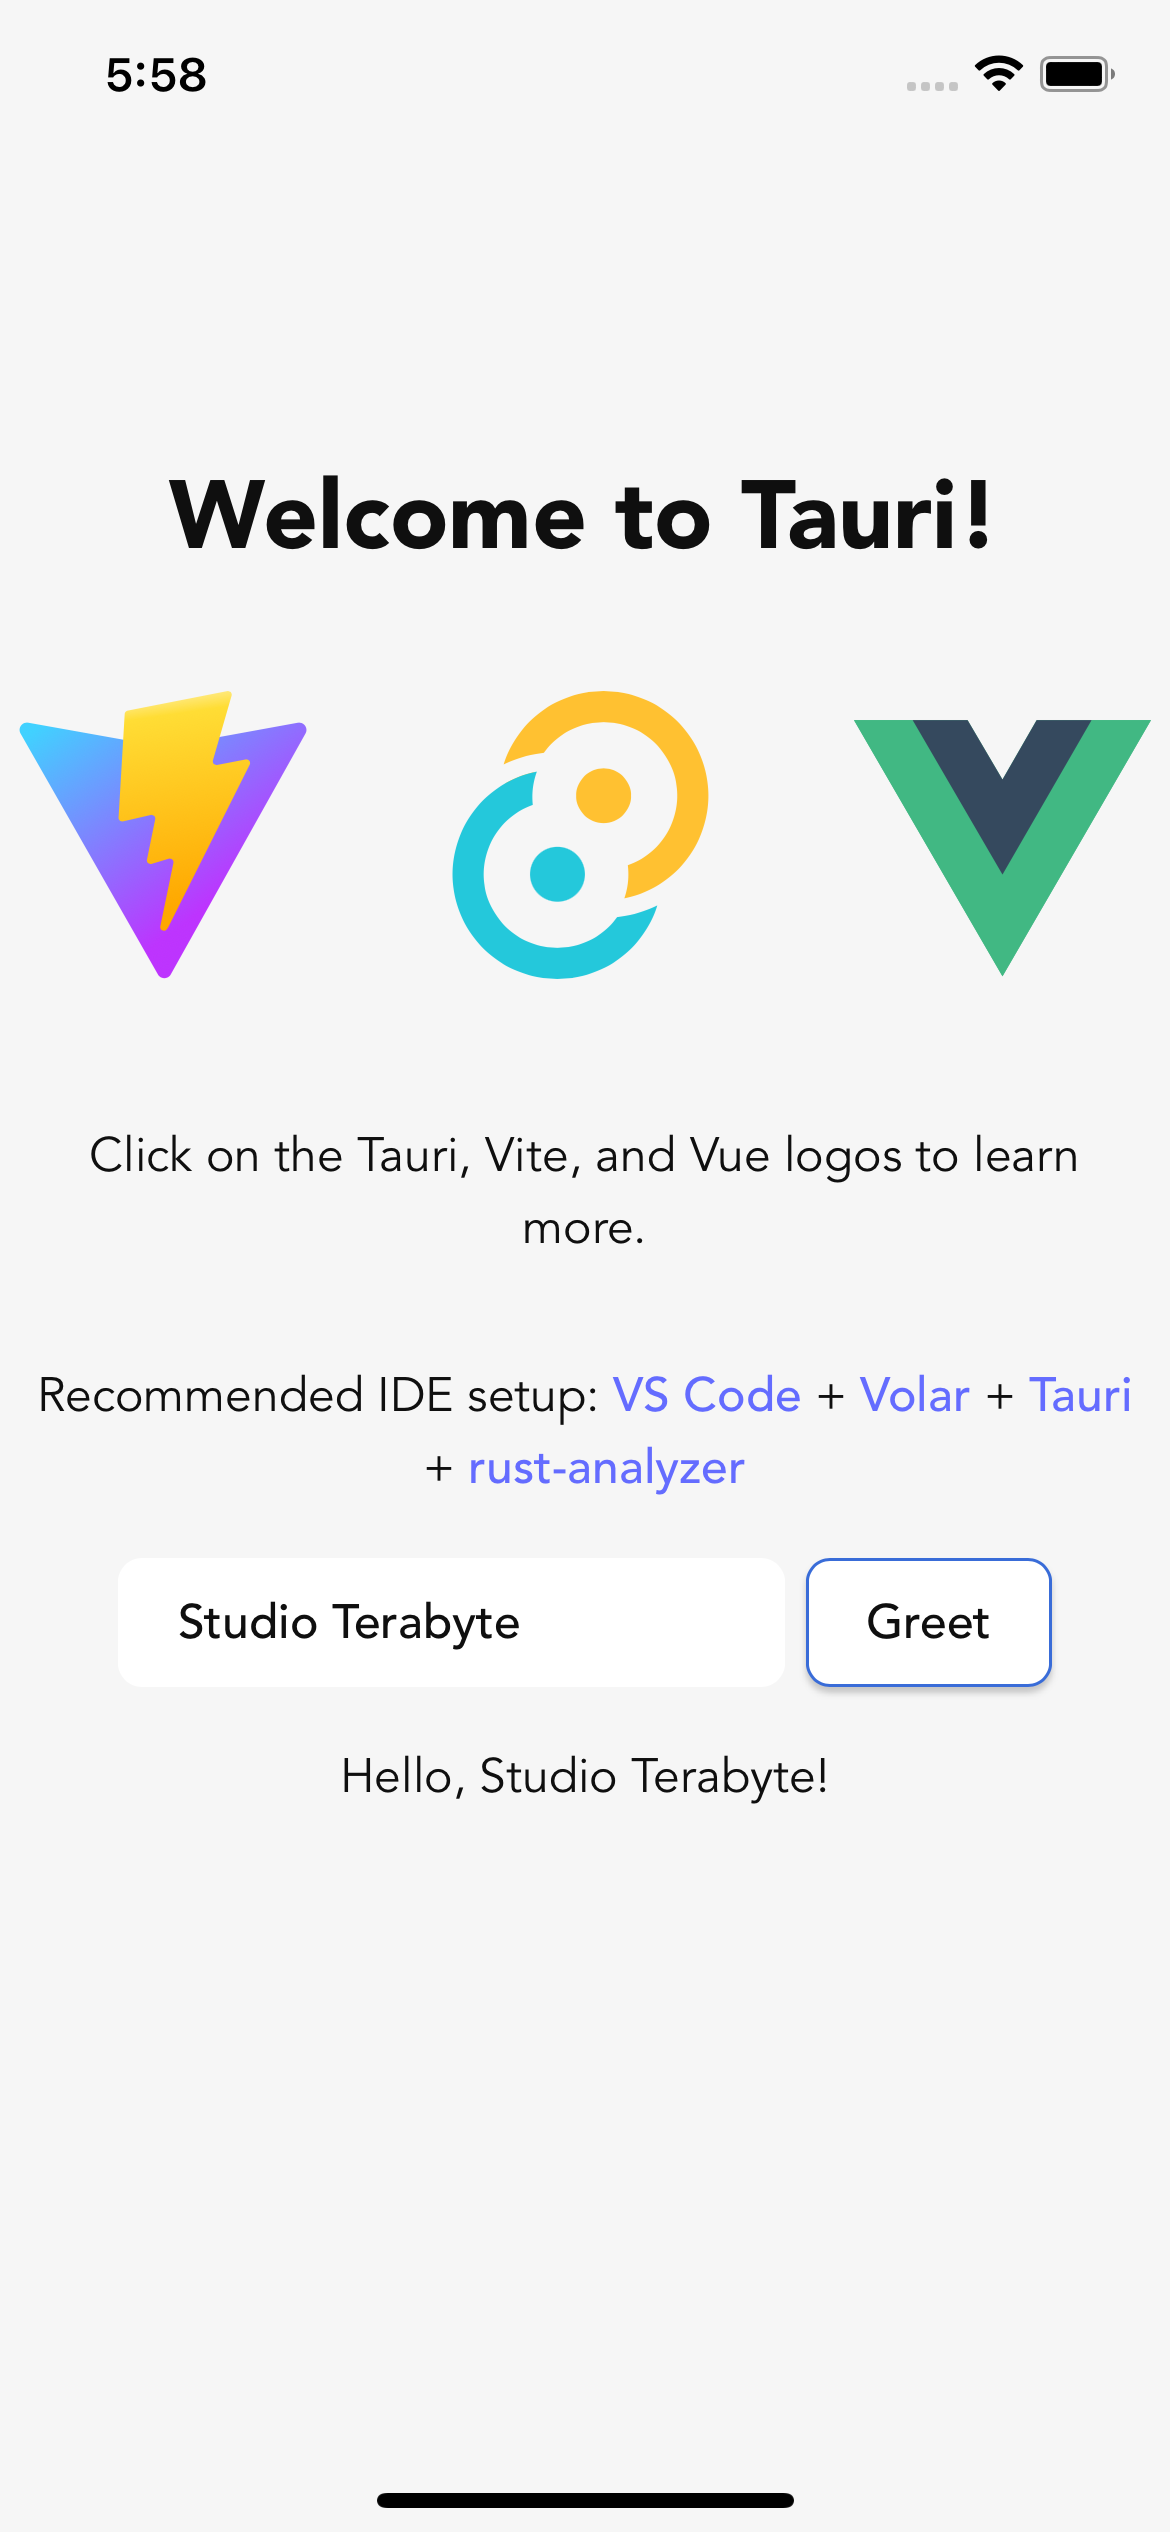
Result
Congrats! You should now be asked in which emulator you want your app to run and see something like this:
Conclusion
In this blog post we've set up a minimal Tauri app which allows us to build installable iOS apps using JS, Vue in our case, and Rust!
From here you should have a solid base to build out your own ideas and launch the amazing app you've always wanted to build!
You can find the code for this article here: GitHub